The Weekend Warrior’s Guide: How to Install a Stunning Wall-Mounted Faucet in 3 Steps
Hey there, Weekend Warriors!
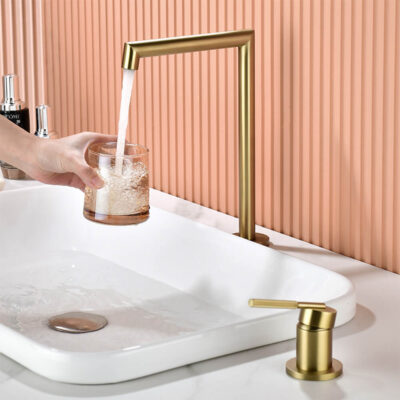
Are you ready to tackle a home upgrade that looks like it was done by a pro but is totally achievable in a single weekend? Swapping out your old, boring faucet for a stunning wall-mounted basin faucet is the perfect project.
A wall-mounted faucet isn't just a style statement; it's a space-saver that makes cleaning your vanity a breeze. And the best part? With modern designs and a little know-how, it's easier than you think. We're going to break it down into three manageable steps.
But first, let's talk about the game-changer that makes this project so DIY-friendly: The Adjustable Concealed Valve.
Traditional wall-mounted faucets required surgical precision with your plumbing. Our upgraded design features a detachable and adjustable bracket that fits a wide range of wall depths and pipe setups. This means you don't need X-ray vision to get it right—just our guide and a little confidence.
Before You Begin: Your Toolbox & Safety Check
Gather Your Tools & Materials:
Your new wall-mounted faucet set (with the adjustable valve!)
Adjustable wrenches or basin wrenches
Pipe tape (Teflon tape)
A level
A pencil
A drill (if needed for mounting)
A bucket or towels
Safety glasses
Step 0: The Non-Negotiable - SHUT OFF THE WATER!
Locate the hot and cold water shut-off valves under your sink and turn them clockwise until they stop.
Turn on the old faucet to drain any remaining water and relieve pressure. Once no water comes out, turn it off again.
This is the most important step. Double-check that the water is off before you proceed.
The 3-Step Installation Process
Step 1: Mount the Magic Box - Securing the Concealed Valve
This is the foundation of the entire project. Get this right, and the rest is smooth sailing.
Assemble the Valve: Follow the manufacturer's instructions to attach the detachable bracket to the main concealed valve body.
Dry-Fit & Mark: Hold the assembled valve unit up to the wall where your pipes are. Use a level to ensure it's perfectly straight—this is crucial for the final look. Once level, lightly mark the wall through the bracket's screw holes.
Secure it: Depending on your wall type (tile, drywall with a stud), drill pilot holes and use the provided screws and wall anchors to firmly secure the bracket to the wall. Don't overtighten, but ensure it's rock-solid.
✅ Pro Tip: The adjustable design of our valve means you have some wiggle room to align it perfectly with your existing pipes. This is what eliminates the frustration of a traditional installation!
Step 2: Connect the Dots - Hooking Up the Plumbing
Now it's time to connect everything behind the scenes.
Wrap the Threads: Apply pipe tape (Teflon tape) clockwise around the threads of your hot and cold water supply lines (the pipes coming from your wall). This creates a watertight seal.
Make the Connection: Connect your water supply lines to the corresponding inlets on the concealed valve. Hand-tighten first, then use your wrench for a final quarter to half turn. Be careful not to overtighten, as this can damage the fittings.
Do a Quick Leak Check (Optional but Recommended): Before closing everything up, you can slowly turn the water supply back on for a moment to check for leaks at the connections. If you see a drip, turn the water back off and tighten the connection a little more.
Step 3: The Grand Finale - Attaching the Faucet
This is the rewarding part where you see your hard work pay off!
Place the Faucet: Simply position the beautiful waterfall spout over the exposed threads of the concealed valve.
Screw it On: Hand-tighten the mounting nuts that come with your faucet. Once snug, use your wrench to give it a final gentle turn to secure it. Again, avoid using excessive force.
The Moment of Truth: Place your bucket under the faucet. Slowly turn the water supply valves back on all the way. Then, turn on your stunning new faucet and watch the water cascade beautifully.
Check for Leaks: Inspect all connection points one final time. If everything is dry, you've done it!
You Did It! Now, Admire Your Work.
Step back and take a look. You've just transformed the look and feel of your bathroom with your own two hands. That sleek, wall-mounted faucet isn't just a fixture anymore—it's a testament to your DIY skills.
Ready to start your own Weekend Warrior project?
[ Explore Our Collection of DIY-Friendly Wall-Mounted Faucets ]
(P.S. Remember, if you run into any issues or have questions during your installation, our friendly customer support team is just an email away. We're here to help you succeed!)
RELATED
Posts
20
Jun
The Case for an Outdoor Shower in 2026
Not every backyard has a pool. Not every home sits near a beach....
read more
20
Jun
Why Your Backyard Needs a Dedicated Outdoor Shower Head
Picture this. You just finished a long swim. Your feet are covered...
read more
18
Jun
Why Every Backyard Needs an Outdoor Shower
Picture this. You just finished a long swim. The kids are dripping pool water...
read more
17
Jun
Why Every Backyard Deserves an Outdoor Shower
Sand in the hallway. Mud on the kitchen tile. Chlorine-scented wet footprints across the...
read more
16
Jun
Imagine stepping out of the pool and straight into a full-body rinse, without tracking a single drop through your house....
read more
15
Jun
Nothing beats the feeling of a warm rinse after a long day in the sun. An outdoor shower turns an...
read more
14
Jun
Anyone who lives near the beach or has a backyard pool knows the drill. You come inside after a swim,...
read more
14
Jun
The Problem With Skipping an Outdoor Shower
Every pool day ends the same way. Wet footprints trail across your patio. Sand...
read more
12
Jun
Nothing ruins a pool day faster than tracking wet sand through the house or dragging pool chlorine onto clean floors....
read more
11
Jun
Why an Outdoor Shower Is No Longer a Luxury
If you have a pool, live near the beach, or simply enjoy...
read more