
Outdoor Shower Head: Enjoy a Refreshing Backyard Rinse Every Summer Day in 2026
The Case for an Outdoor Shower in 2026
Not every backyard has a pool. Not every home sits near a beach....
read more
Feb
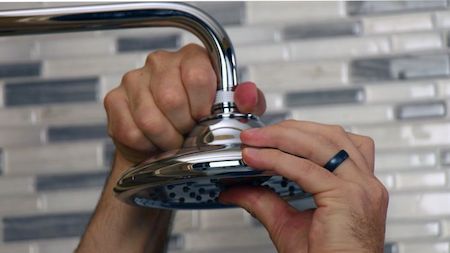 Cut off the water supply to your shower head. Start by putting off the shower at the knob for inspection or replacement. Mineral deposits like lime can gather and clog the holes, causing a leaky shower head. This is the best place to start if you aren’t sure of what is making your showerhead leak. It costs nothing to do, and you don’t have to dismantle your entire shower fixture to do it.
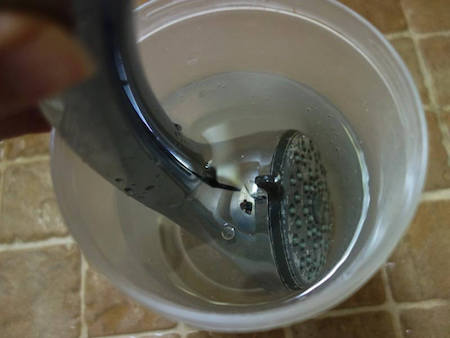 Get a bowl, basin or bucket big enough to contain the faceplate or showerhead. A bathroom sink can also work perfectly well if it is large enough to hold the showerhead and if it is not in use.
Plug the sink to ensure no liquid escapes and fill it (or the container) with white vinegar and some coarse salt. Put enough vinegar to cover the faceplate or showerhead fully.
Leave the showerhead or faceplate in the container or sink of vinegar for at least 8 hours. This will help in dissolving the mineral deposits and buildup.
Get a bowl, basin or bucket big enough to contain the faceplate or showerhead. A bathroom sink can also work perfectly well if it is large enough to hold the showerhead and if it is not in use.
Plug the sink to ensure no liquid escapes and fill it (or the container) with white vinegar and some coarse salt. Put enough vinegar to cover the faceplate or showerhead fully.
Leave the showerhead or faceplate in the container or sink of vinegar for at least 8 hours. This will help in dissolving the mineral deposits and buildup.
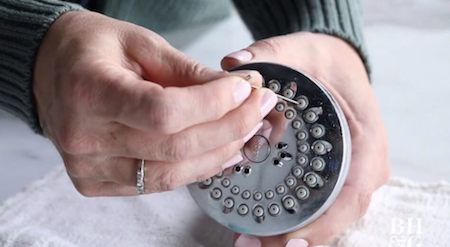 After soaking for 8 hours, the white vinegar would have done its job and dissolved the lime and other mineral deposits. Remove it from the container and find a toothpick or any other thin object that can fit in the holes of the showerhead. Stick this thin object into each of the showerhead holes so that the debris can come off. Afterwards, scrub the faceplate clean with a stiff plastic brush.
An air compressor can also be used to blow out the debris gently.
After soaking for 8 hours, the white vinegar would have done its job and dissolved the lime and other mineral deposits. Remove it from the container and find a toothpick or any other thin object that can fit in the holes of the showerhead. Stick this thin object into each of the showerhead holes so that the debris can come off. Afterwards, scrub the faceplate clean with a stiff plastic brush.
An air compressor can also be used to blow out the debris gently.
 1) Turn off the water supply to your bathroom
As usual, start by shutting off the water supply by turning off the valve to the bathroom or the entire home’s main supply. A diverter valve has a main purpose: switch the water from the bathtub faucet to the showerhead. Due to the passage of time, this valve can become weaker and clogged up due to the buildup of sediments. When a diverter valve is faulty, it will leak even when water should be allowed to flow through the bathtub faucet. A faulty diverter valve can be fixed by cleaning, but most times, it’s better to replace it.
2) Unscrew and remove the faucet handle to expose the diverter valve
Find the screw to the faucet handle, which is either exposed openly or hidden under a cap. If it is hidden under a cap, remove the cap with a tiny pocket knife.
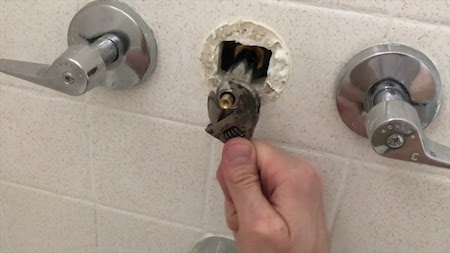
3) Take out the diverter valve
Removing the diverter valve involves separating the valve assembly from the hex nut on the faucet stem by unscrewing it. If you find it difficult to do, get a vinegar-soaked rag and wrap it around the components for a short period to clear up any limescale present. You can also use WD-40.
4) Clean the diverter valve or replace it
When you have unscrewed the diverter valve, you can now clean it up using a small stiff wire brush along with white vinegar. Also, check for sediment buildup and wear and tear in the diverter valve. When you have confirmed that there is none, leave the valve to sit out to dry. You might have to replace the valve assembly if you see any cracks on the diverter valve.
5) Reassemble the faucet handle and determine if the leaking shower head is fixed.
Do all the previous steps in reverse to reassemble the faucet handle. Turn on the water supply to see if the showerhead is now fixed before you screw it back on.
1) Turn off the water supply to your bathroom
As usual, start by shutting off the water supply by turning off the valve to the bathroom or the entire home’s main supply. A diverter valve has a main purpose: switch the water from the bathtub faucet to the showerhead. Due to the passage of time, this valve can become weaker and clogged up due to the buildup of sediments. When a diverter valve is faulty, it will leak even when water should be allowed to flow through the bathtub faucet. A faulty diverter valve can be fixed by cleaning, but most times, it’s better to replace it.
2) Unscrew and remove the faucet handle to expose the diverter valve
Find the screw to the faucet handle, which is either exposed openly or hidden under a cap. If it is hidden under a cap, remove the cap with a tiny pocket knife.
3) Take out the diverter valve
Removing the diverter valve involves separating the valve assembly from the hex nut on the faucet stem by unscrewing it. If you find it difficult to do, get a vinegar-soaked rag and wrap it around the components for a short period to clear up any limescale present. You can also use WD-40.
4) Clean the diverter valve or replace it
When you have unscrewed the diverter valve, you can now clean it up using a small stiff wire brush along with white vinegar. Also, check for sediment buildup and wear and tear in the diverter valve. When you have confirmed that there is none, leave the valve to sit out to dry. You might have to replace the valve assembly if you see any cracks on the diverter valve.
5) Reassemble the faucet handle and determine if the leaking shower head is fixed.
Do all the previous steps in reverse to reassemble the faucet handle. Turn on the water supply to see if the showerhead is now fixed before you screw it back on.
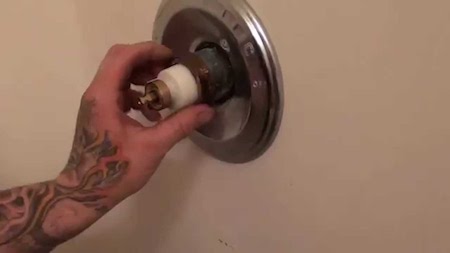 3) Remove and replace the cartridge.
Depending on the manufacture, there are different methods you can use to remove the cartridge. A newly purchased cartridge might come with a cartridge removal cap. Typically, when removing the cartridge, you should try to unscrew the hex nut covering the cartridge stem, then untwist the cartridge stem and remove it with pliers.
3) Remove and replace the cartridge.
Depending on the manufacture, there are different methods you can use to remove the cartridge. A newly purchased cartridge might come with a cartridge removal cap. Typically, when removing the cartridge, you should try to unscrew the hex nut covering the cartridge stem, then untwist the cartridge stem and remove it with pliers.